

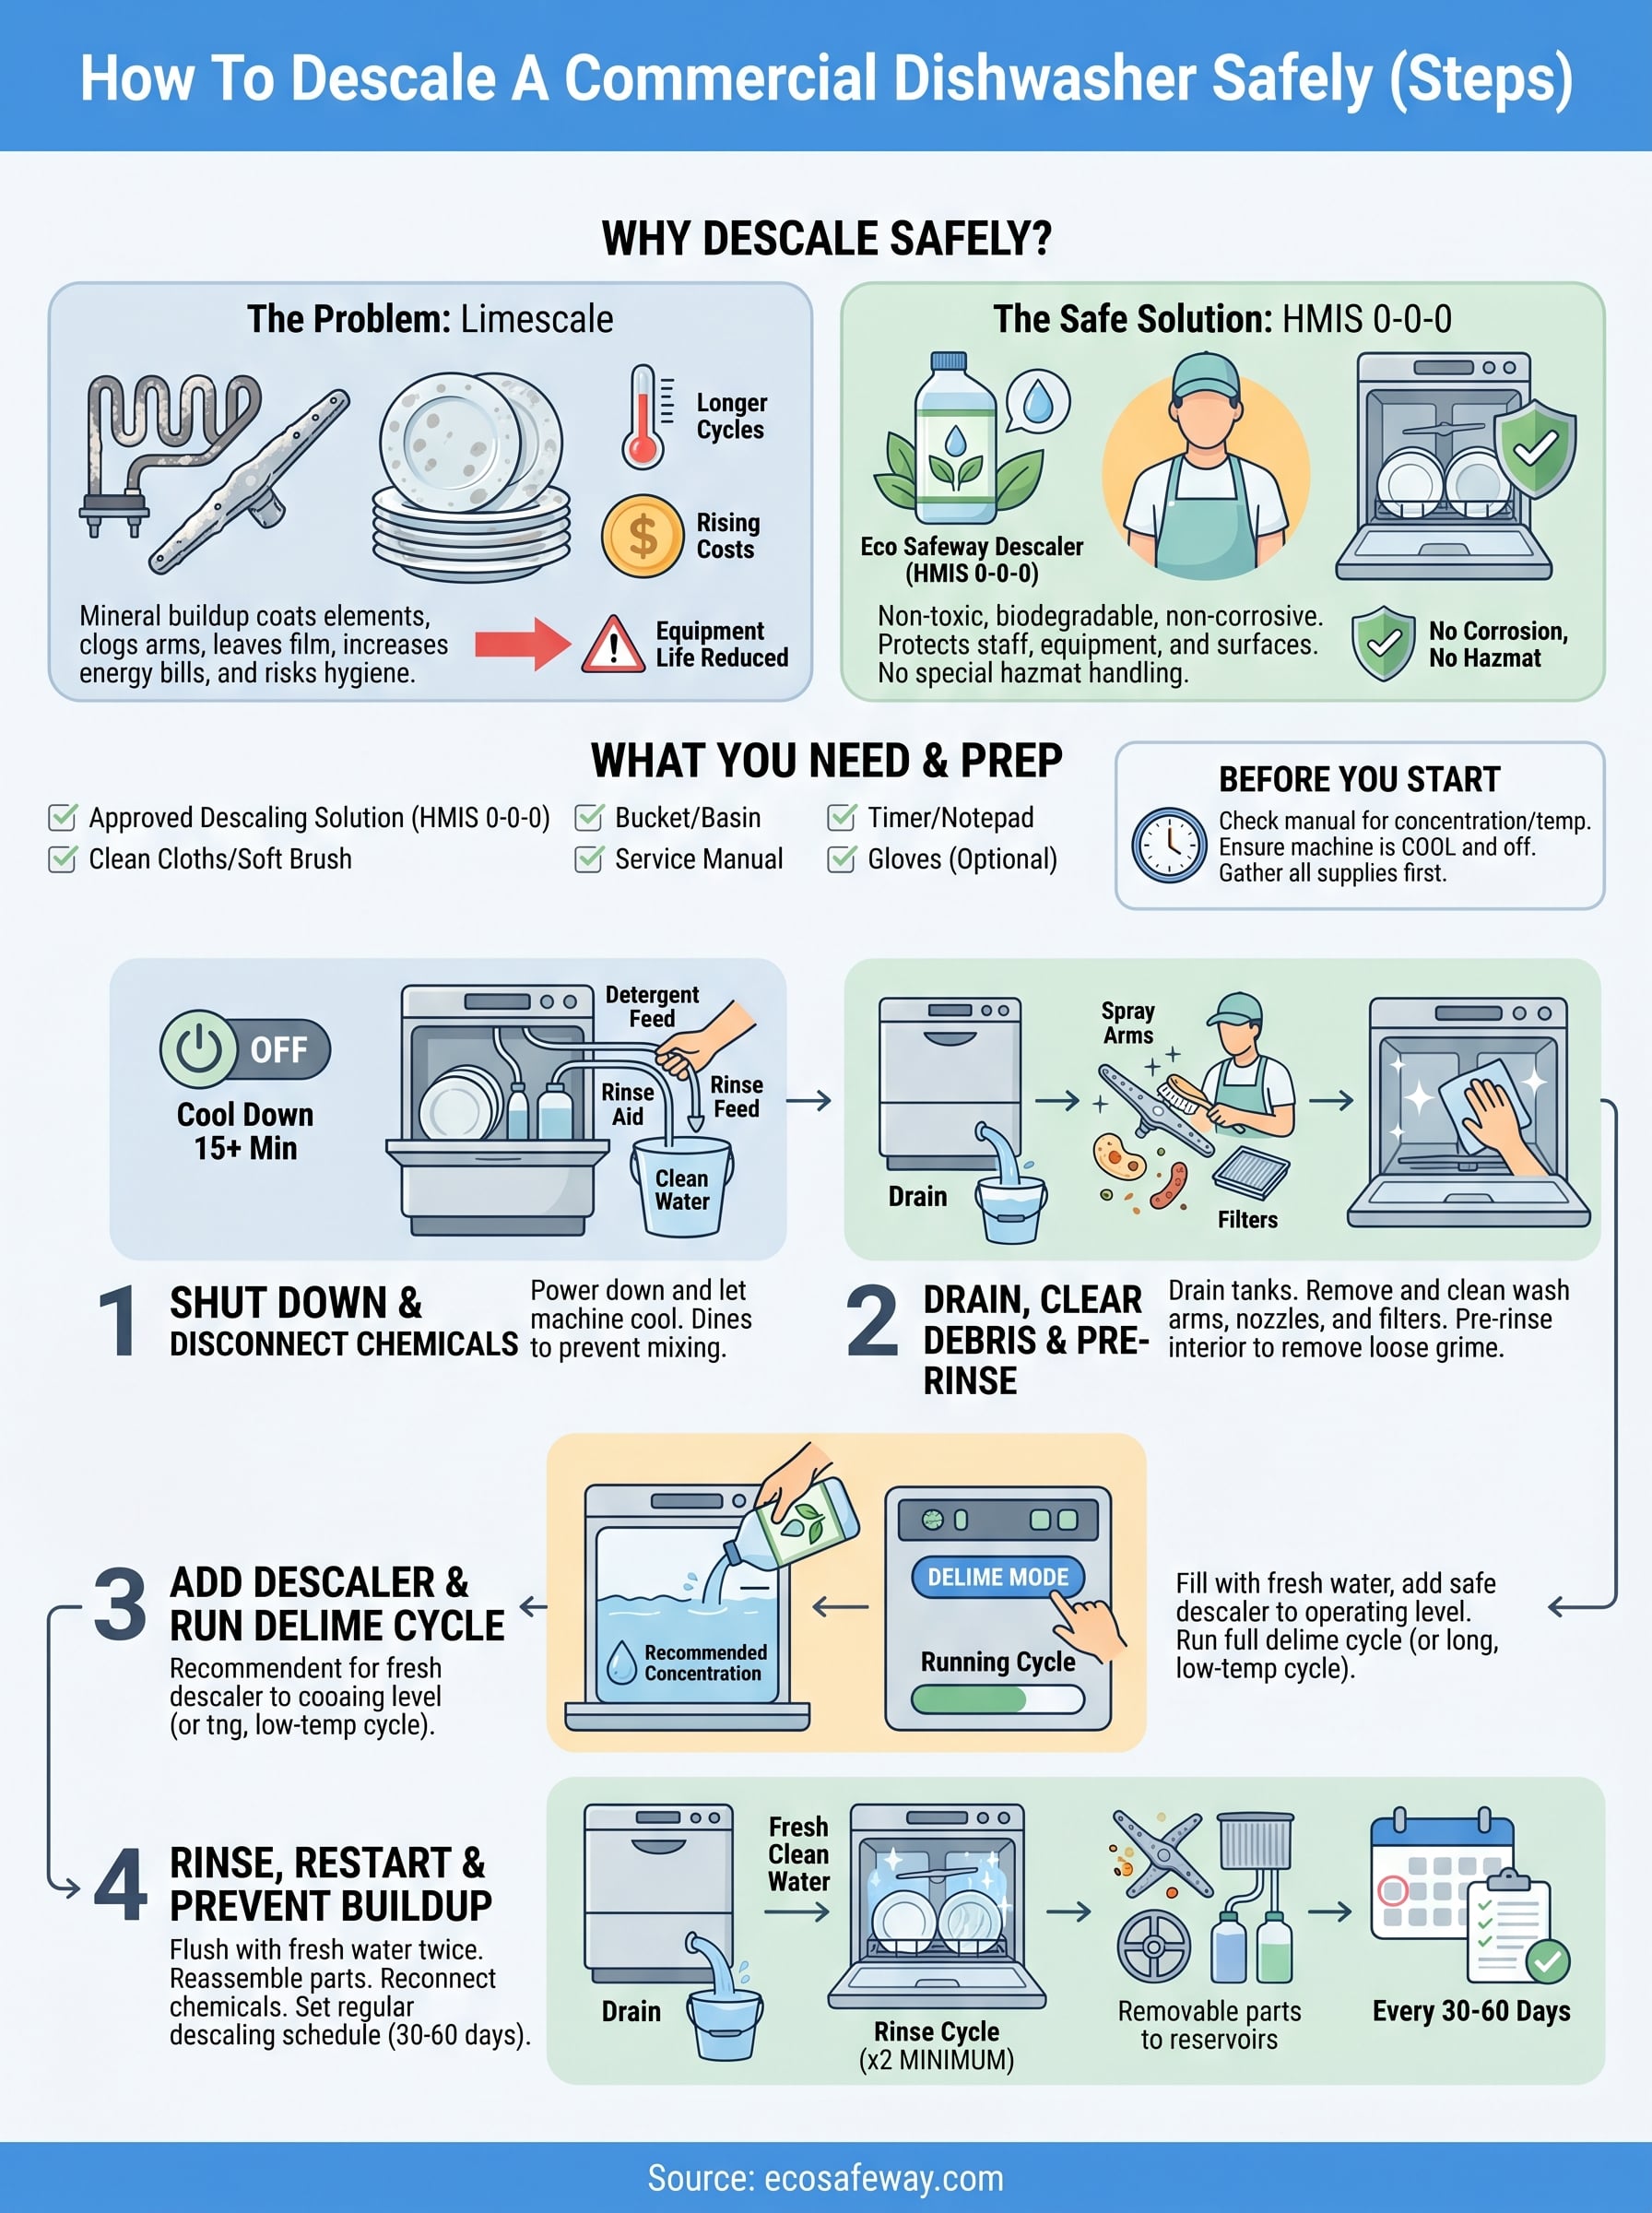
Limescale doesn't announce itself with a bang. It builds quietly, coating heating elements, clogging spray arms, and leaving a chalky film on dishes that no amount of detergent can fix. If you've noticed longer cycle times, rising energy bills, or glassware that looks worse coming out than going in, you're probably overdue to descale your commercial dishwasher.
Left unchecked, mineral buildup shortens equipment life and creates hygiene risks that can put your operation at stake. Most facility managers know descaling matters, but many still reach for harsh acid-based products that corrode gaskets, damage stainless steel, and require protective gear just to handle safely.
There's a better approach. At Eco Safeway, we manufacture HMIS 0-0-0 rated descaling solutions that break down limescale effectively without corroding your equipment or exposing your staff to hazardous chemicals. Our products are non-toxic, biodegradable, and require no special hazmat handling, which matters when you're maintaining machines that touch the surfaces people eat from.
This guide walks you through how to descale a commercial dishwasher step by step, covers how often you should do it, and explains what to look for in a descaling product so you protect both your equipment and the people who rely on it.
Before you start: safety, setup, and what to use
Rushing into a descaling job without the right preparation wastes time and can damage your machine. Before you learn how to descale a commercial dishwasher properly, you need to verify two things: what product you're using and whether your workspace and supplies are ready. Getting both right upfront protects your staff, prevents equipment damage, and makes the entire process faster and more predictable.
Choose the right descaler
Not all descalers work the same way, and the differences matter more than most buyers realize. Traditional acid-based deliming agents, including those containing hydrochloric or phosphoric acid, dissolve mineral scale quickly but at a cost. They corrode rubber gaskets and pit stainless steel over repeated use, and they require workers to wear gloves and eye protection every time they handle them. In a busy kitchen or facility environment, that creates a real compliance and liability issue.
A non-toxic, HMIS 0-0-0 rated descaler gives you the same mineral-breaking performance without hazardous chemical exposure or special storage and shipping requirements.
Eco Safeway's biodegradable descaling formula is phosphate-free and non-corrosive, which means it breaks down calcium and magnesium deposits without attacking the internal components of your dishwasher. It ships without hazmat restrictions and doesn't require protective gear to handle safely, which reduces friction for your team every time maintenance is due.
What you'll need before you start
Gather everything before you shut the machine down. Stopping mid-process to track down a missing tool is how descaling jobs go sideways and drag on longer than necessary.
Here's what to have on hand:
- Approved descaling solution (non-toxic, non-corrosive, and compatible with your machine's manufacturer guidelines)
- Clean cloths or a soft brush for wiping down spray arms and filters
- A bucket or basin for draining and pre-rinse work
- Access to your machine's service manual to confirm cycle settings and deliming mode options
- Gloves (optional with HMIS 0-0-0 products, but standard practice in any cleaning environment)
- A timer or notepad to log cycle duration and record the service date for your maintenance records
Check your machine's manual for any manufacturer-specific instructions on descaler concentration ratios or cycle temperature limits before you begin. Some commercial units have a dedicated delime mode that adjusts water temperature automatically during the process.
Step 1. Shut down and disconnect chemicals
The first step in knowing how to descale a commercial dishwasher correctly is to shut everything down before any product goes in. Skipping this part creates two specific problems: the descaler won't work at full strength because it mixes with residual detergent, and you risk exposing active heating elements to concentrated solution without proper water flow.
Power down the machine
Turn your dishwasher off completely and allow it to cool down for at least 10 to 15 minutes before opening any panels or access points. Commercial dishwashers run at high temperatures, and working on a hot machine risks burns and can affect how the descaler distributes through the system once you add it. Check the control panel to confirm no active cycles are running before you proceed.
Never add a descaling solution to a machine that is still hot or mid-cycle. You'll get unpredictable results and risk damaging internal components.
Disconnect all chemical feed lines
Your machine likely runs on automatic chemical dosing systems for detergent and rinse aid. You need to disconnect or bypass these lines before you start the descaling process. Running the descaler alongside active detergent or sanitizer chemistry neutralizes the descaler and reduces its ability to break down mineral deposits.
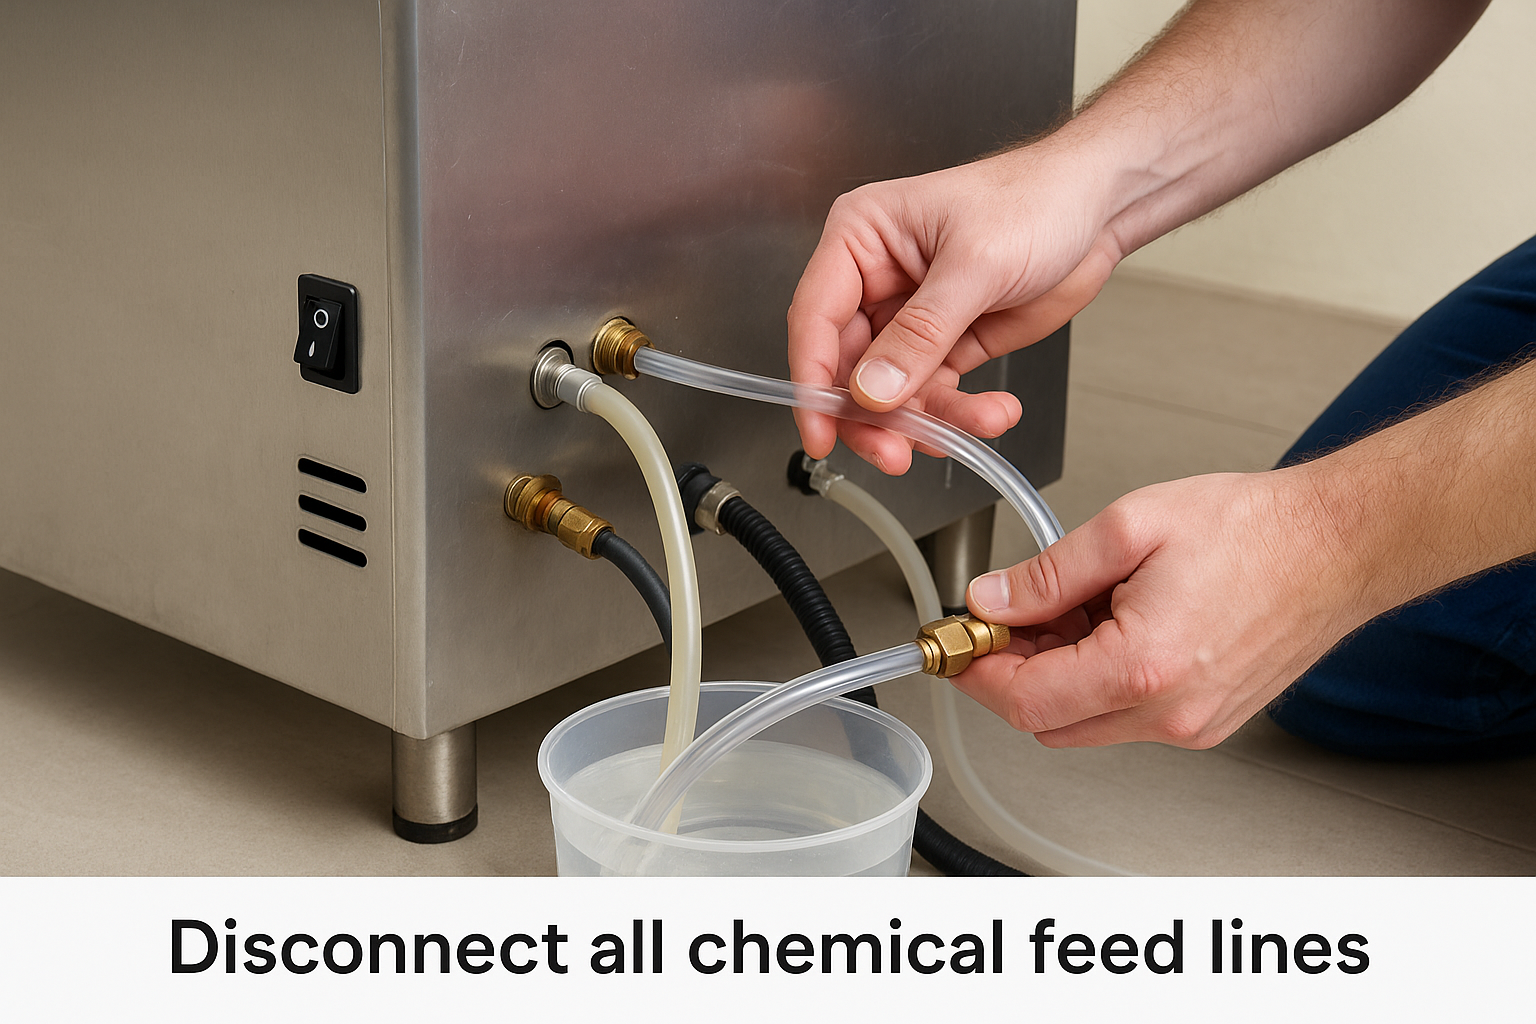
Remove the detergent and rinse aid feed tubes from their reservoirs and place them in a clean container filled with water. This keeps the lines clear while ensuring no chemical crossover occurs during the descaling run.
Step 2. Drain, clear debris, and pre-rinse the machine
With the machine powered down and chemical lines disconnected, your next move is to drain the tanks completely and clear out anything that would block the descaler from doing its job. A clean, debris-free interior is what allows the descaling solution to make direct contact with mineral deposits on the surfaces where they've built up.
Drain and remove removable components
Start by draining any standing water from the wash and rinse tanks. Once the tanks are empty, remove all removable components including wash arms, spray nozzles, and filters. These parts collect the heaviest mineral buildup and need to be addressed separately before you run any descaling cycle.
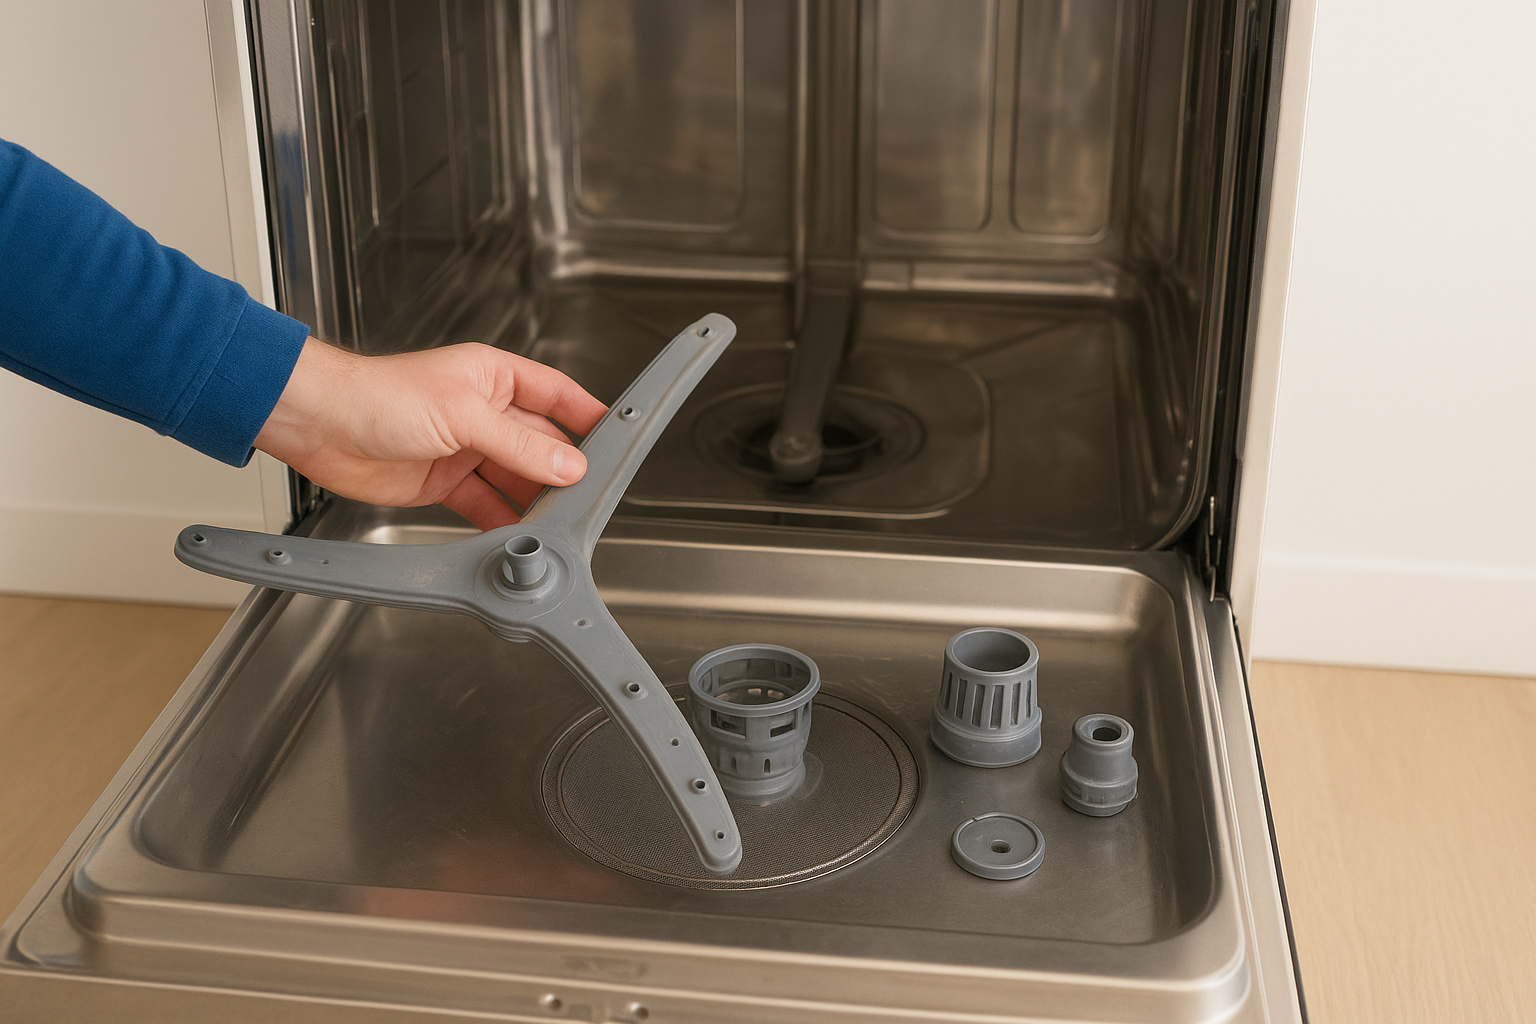
Check each component for visible scale deposits, food debris, and blocked spray holes. Clogged nozzles are one of the most common causes of uneven cleaning in commercial units. Use a soft brush or cloth to clear any visible blockage before setting the parts aside. Avoid metal tools that can scratch or damage the surface finish.
Blocked spray arms reduce water coverage during the descale cycle, which means the descaler won't reach all internal surfaces evenly.
Pre-rinse the interior
Run a short manual rinse of the interior using clean water before adding any descaling product. This step removes loose food particles and detergent residue that would otherwise dilute your descaler. Knowing how to descale a commercial dishwasher properly means starting with a clean baseline, not layering solution on top of existing grime.
Wipe down the door gaskets and interior walls with a damp cloth. This takes two minutes and makes the descaling cycle noticeably more effective.
Step 3. Add descaler and run the delime cycles
With your machine emptied and pre-rinsed, you're ready for the core of how to descale a commercial dishwasher: adding the descaling solution and running it through the system. This is where mineral deposits actually break down, so following the correct concentration and cycle sequence makes a direct difference in results.
Mix and load the descaling solution
Fill the wash tank with fresh water to the operating level specified in your machine's manual. Then add your descaling solution at the manufacturer's recommended concentration ratio, typically printed on the product label or available from your supplier. For Eco Safeway's dishwasher descaler, no special measuring equipment or protective gear is required, which speeds up this step considerably compared to acid-based alternatives.
Never exceed the recommended concentration ratio. More product doesn't mean faster results, and over-concentration can leave residue that requires additional rinsing cycles to clear.
Run the delime cycle
Start the machine and allow it to complete a full delime or descaling cycle as defined by your unit's manual. Many commercial dishwashers include a dedicated delime mode that runs at a lower temperature for a longer duration to allow the solution to work on stubborn calcium and magnesium deposits. If your machine doesn't have a dedicated mode, run a standard wash cycle at normal operating temperature and repeat it once.
Monitor the cycle from start to finish. Check spray arm coverage and tank water color during the run. Cloudy or discolored water is normal and confirms the descaler is actively dissolving mineral buildup inside the system.
Step 4. Rinse, restart, and prevent scale from coming back
The final step in how to descale a commercial dishwasher is critical for removing any remaining descaler residue and returning the machine to clean, safe operation. Skipping or shortening the rinse phase is the most common mistake in the entire process, and it leaves trace solution in the system that affects the next wash cycle.
Flush and verify the system
Drain the wash tank completely after the descaling cycle finishes. Refill with fresh clean water and run a full rinse cycle at normal operating temperature. Repeat this rinse at least twice to confirm no descaling solution remains in the tank or spray lines. Reassemble your spray arms, filters, and nozzles, then run one final cycle with no detergent to verify even water coverage across all spray zones before returning the machine to service.
If you see cloudy water during the flush rinse, run an additional cycle before reconnecting your chemical feed lines.
Reconnect your detergent and rinse aid lines, prime the dosing system, and confirm the machine completes a standard wash cycle without error codes before putting it back into full production.
Set a descaling schedule to prevent buildup
The best way to reduce future scale accumulation is to descale on a fixed schedule based on your local water hardness. Hard water areas typically require descaling every 30 to 60 days. Track each service date using a simple maintenance log like this:
| Service Date | Product Used | Cycles Run | Next Service Due |
|---|---|---|---|
| 2026-06-05 | Eco Safeway Descaler | 2 rinse cycles | 2026-07-05 |
Logging each session keeps your team accountable and gives you documented proof of maintenance for inspections or warranty claims.
Get back to spotless results
Now you know exactly how to descale a commercial dishwasher from start to finish: shut down cleanly, clear the interior, run the descaling cycle with the right product, and rinse thoroughly before returning the machine to service. Each step builds on the last, and skipping any one of them reduces how effective the process actually is.
Consistent descaling protects your equipment investment, keeps cycle times short, and eliminates the chalky residue that shows up on dishes and glassware when mineral buildup goes unchecked. The biggest factor in long-term results is your product choice. A non-toxic, non-corrosive formula means your staff handles it safely every time without the liability that comes with acid-based alternatives.
If you want a cleaner that handles both descaling and odor control in one step, check out Eco Safeway's dishwasher and washing machine cleaner tablets, a food-safe, enzyme-powered option built for regular commercial maintenance.