

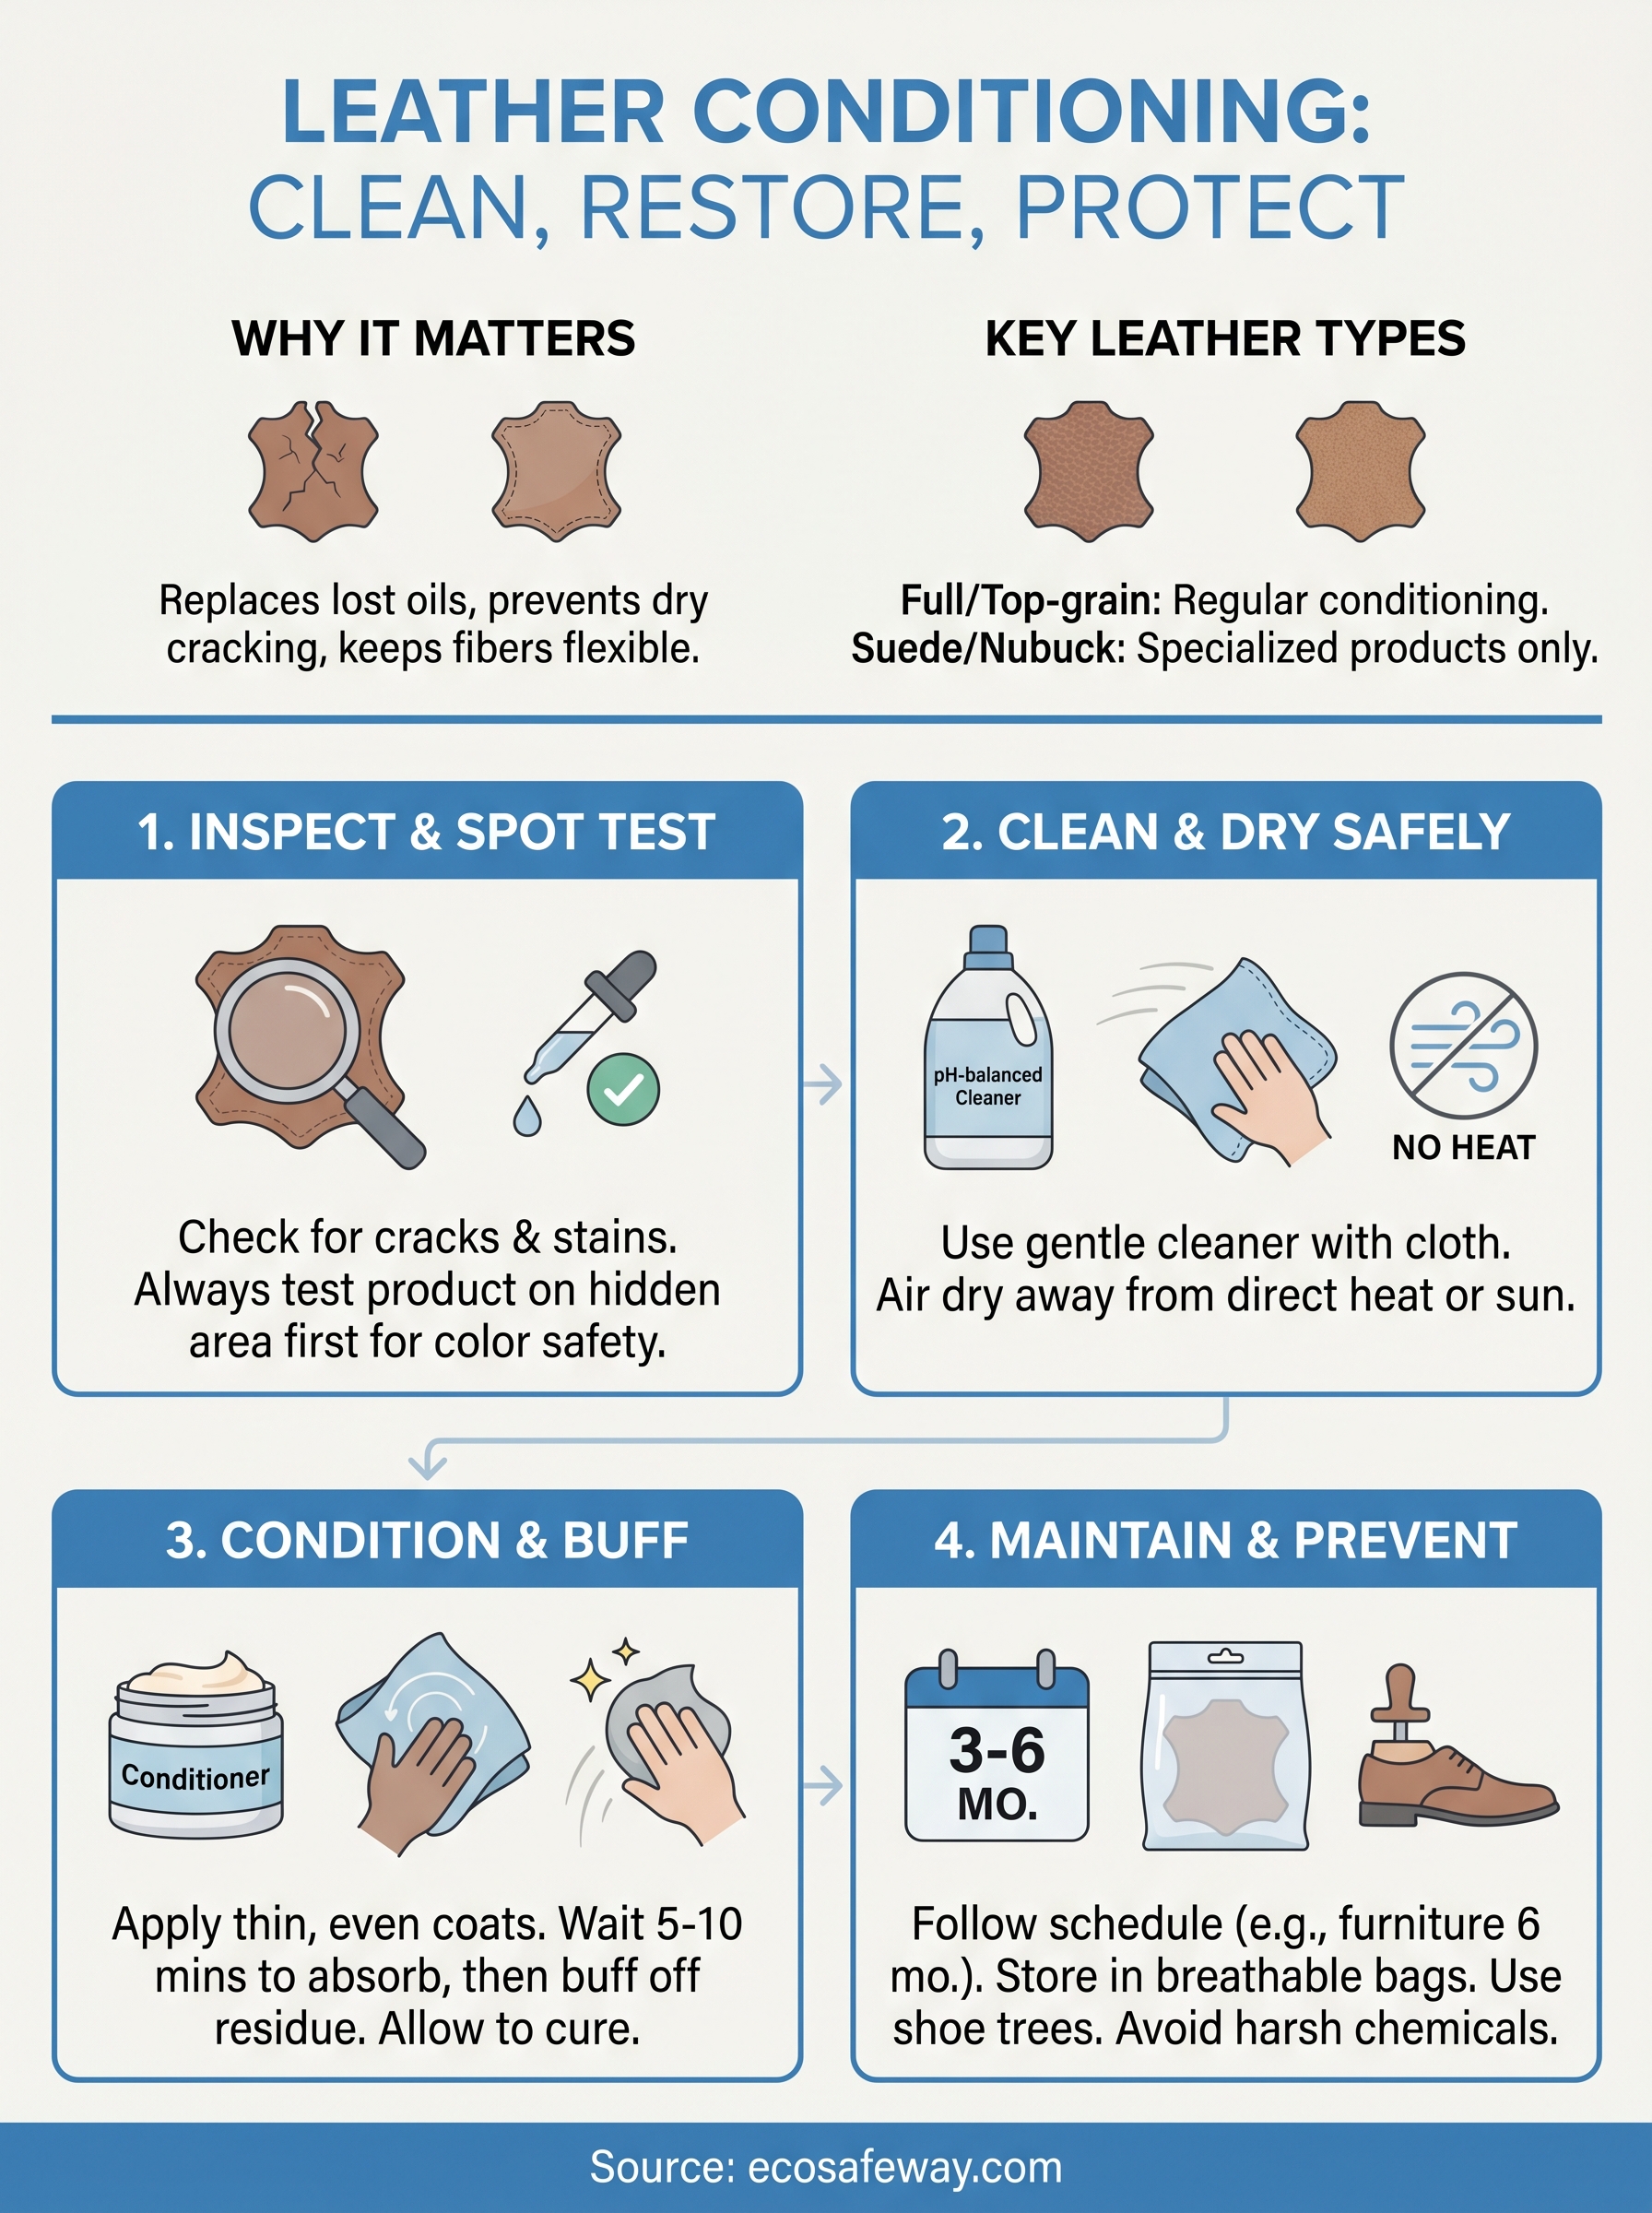
Leather ages beautifully, but only if you take care of it. Without regular leather conditioning, your jackets, bags, furniture, and car interiors will dry out, crack, and lose the supple feel that made them worth buying in the first place. The good news: proper maintenance isn't complicated, and it doesn't require harsh chemicals to get right.
That last point matters more than most people realize. Many conventional leather care products contain petroleum-based solvents, silicones, and other ingredients that can actually degrade leather fibers over time, while also introducing unnecessary toxins into your home or workspace. At Eco Safeway, we manufacture non-toxic, biodegradable cleaning solutions rated HMIS 0-0-0 for marine, commercial, industrial, and residential use. We believe effective cleaning and conditioning should never come at the cost of your health or the environment, and that principle extends to every surface you maintain, leather included.
This guide walks you through everything you need to know: how to clean leather properly before conditioning, which products and natural alternatives actually work, how often to condition different types of leather, and the mistakes that shorten leather's lifespan. Whether you're restoring a neglected leather couch or maintaining a well-loved pair of boots, you'll leave with a clear, practical routine you can start using today.
What leather needs conditioning and why
Leather is a natural material, and like your skin, it needs moisture and oils to stay flexible and strong. When you tan animal hide into leather, you preserve its structure, but you also strip out the natural oils that kept it supple while the animal was alive. Over time, exposure to heat, sunlight, sweat, and dry air pulls the remaining moisture out, leaving the fibers brittle and prone to cracking. Regular leather conditioning replaces those oils before the damage becomes visible, not after. Starting that routine early is always easier than trying to reverse neglect later.
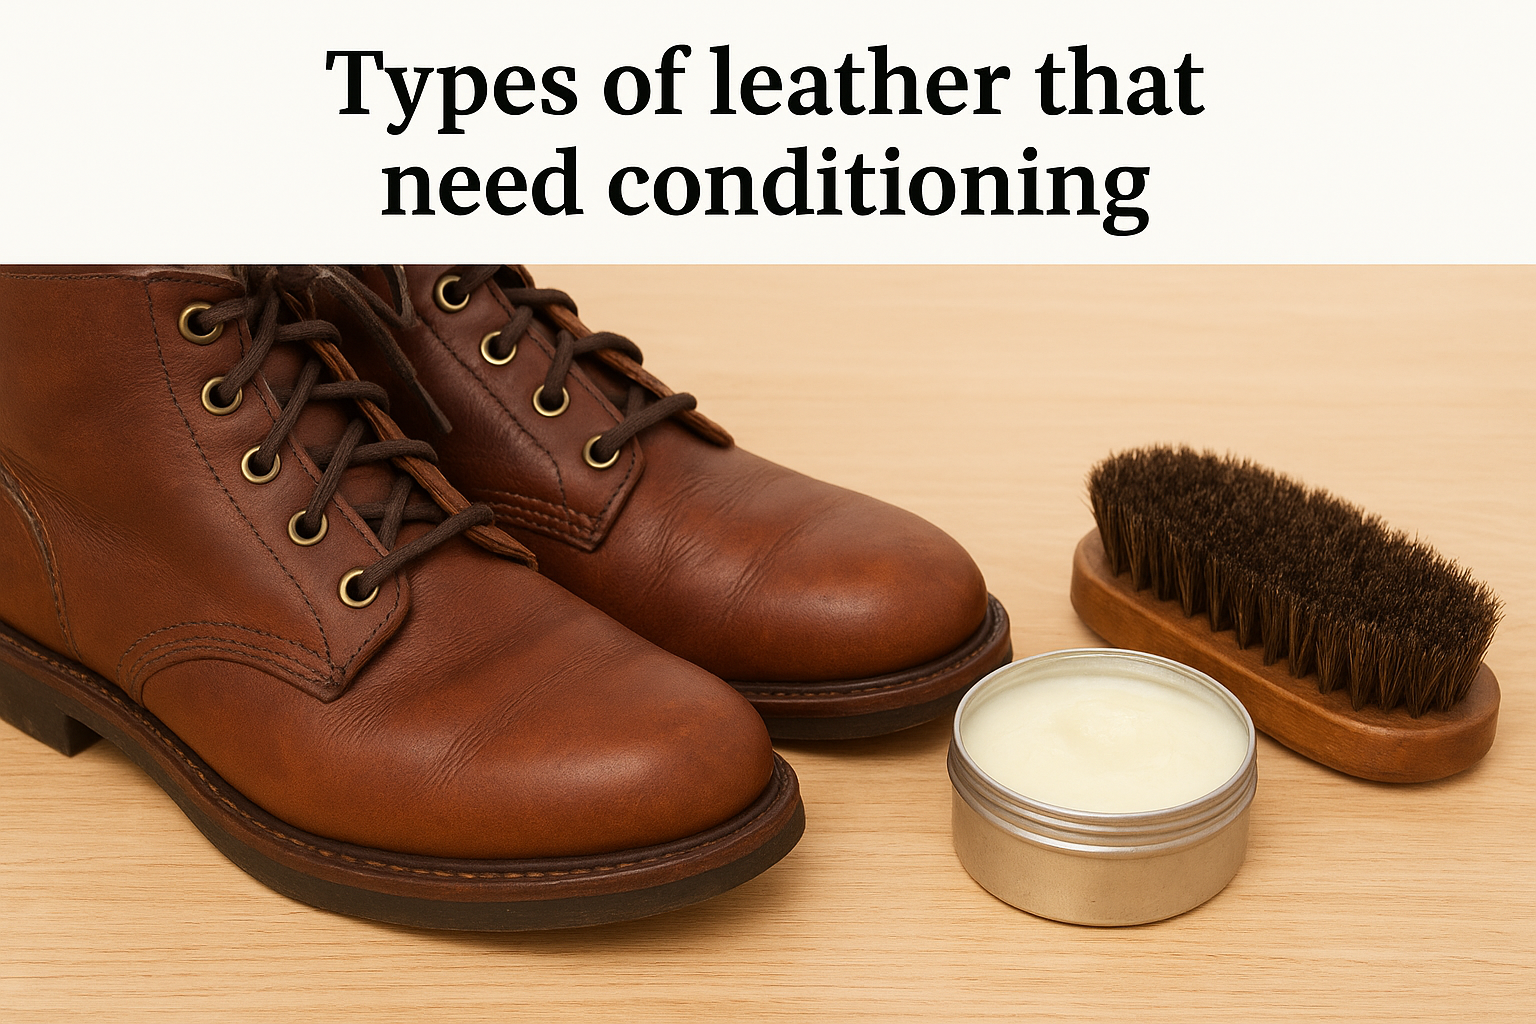
Types of leather that need conditioning
Not every leather product needs the same attention, but most genuine leather goods benefit from conditioning. Full-grain and top-grain leather are the most common types used in furniture, footwear, bags, and automotive interiors, and they absorb conditioner well because their surface remains relatively porous. Suede and nubuck have a raised, textured finish and require specialized conditioning products that won't mat down the fibers or leave an oily residue. Patent leather, on the other hand, has a sealed lacquer coating that makes traditional conditioners largely unnecessary and sometimes damaging to the finish.
Here's a quick reference for the most common leather types and their conditioning needs:
| Leather Type | Conditioning Needed | Notes |
|---|---|---|
| Full-grain leather | Yes, regularly | Most durable; absorbs conditioner well |
| Top-grain leather | Yes, regularly | Common in furniture and bags |
| Corrected-grain leather | Yes, less frequently | More uniform surface; lower porosity |
| Suede | Yes, specialized products | Use suede-specific conditioner only |
| Nubuck | Yes, specialized products | Similar to suede; avoid over-saturation |
| Patent leather | Rarely | Sealed surface; wipe clean instead |
| Bonded leather | Minimal | Prone to peeling; conditioning won't reverse damage |
What happens when leather dries out
Drying out is a slow process, which is exactly why people often miss it until the damage is done. Cracking and peeling are the most obvious signs, but before you see those, you'll notice the leather losing its sheen, feeling stiff, or developing a grayish, faded tone. Small surface cracks tend to appear along flex points first, like the seat crease of a sofa or the toe box of a shoe, where repeated bending stresses the fibers the most.
Once leather cracks deeply enough to reach the lower hide layers, no amount of conditioning will fully restore it. You can improve the appearance with fillers and dyes, but the structural integrity is gone.
At that stage, you're doing damage control, not maintenance. Prevention is genuinely cheaper than restoration, which is why starting a conditioning routine early, even on brand-new leather goods, pays off over the long term. A few minutes of care every few months protects years of investment.
The role of oils and moisture in leather health
Leather fibers are held together by a complex protein structure that depends on lubrication to stay flexible. When conditioners penetrate the surface, they coat individual fibers and allow them to move against each other without friction. That's what gives well-maintained leather its characteristic soft, supple feel. Without that lubrication, the fibers grind against each other every time the leather flexes, slowly breaking down the material from the inside out before any surface damage becomes visible.
Natural oils like lanolin, neatsfoot oil, and jojoba oil have been used for centuries because their molecular structure closely mimics the oils found in leather. Modern conditioners often combine these with emulsifiers and protective agents that help the formula penetrate evenly without leaving a greasy surface residue. Regardless of which product you choose, the goal stays the same: restore what daily wear and environmental exposure continuously take away.
Choose the right conditioner and cleaner
Picking the wrong product is one of the fastest ways to damage leather you're trying to protect. Commercial conditioners vary widely in ingredients and intended use, so matching the product to your specific leather type prevents discoloration, residue buildup, and premature wear. Before you buy anything, check your leather item's care label or manufacturer recommendations. Many brands specify whether their product works with aniline-dyed, pigmented, or protected leather, and that distinction changes what conditioner will perform safely on your item.
Conditioner types and when to use each
Cream-based conditioners are the most versatile option for full-grain and top-grain leather. They penetrate the surface without over-saturating it, which makes them a reliable everyday choice for furniture, shoes, and bags. Oil-based conditioners like neatsfoot oil or mink oil deliver deeper hydration and work well on very dry or stiff leather, but they can permanently darken certain finishes, so always run a spot test first. For suede and nubuck, skip both and use a dry spray or foam conditioner specifically formulated for napped leather surfaces.
| Leather Type | Recommended Conditioner | Avoid |
|---|---|---|
| Full-grain / top-grain | Cream or water-based conditioner | Heavy silicone sprays |
| Suede / nubuck | Dry spray or foam (suede-specific) | Oil-based conditioners |
| Corrected-grain | Light cream or lotion | Thick paste waxes |
| Automotive leather | pH-neutral leather cream | Alcohol-based products |
| Boots / work leather | Neatsfoot oil or beeswax blend | Petroleum solvents |
Clean before you condition
Conditioning dirty leather seals grime into the surface, which accelerates wear rather than preventing it. You need a dedicated leather cleaner, not a general-purpose household spray. Most leather cleaners are pH-balanced and free of harsh solvents, which keeps the surface intact while lifting dirt, sweat residue, and body oils. Saddle soap works well on tougher leathers like boots, but it can dry out softer leathers if you use it too frequently, so limit it to heavily soiled work leather.
Never use dish soap, bleach, or all-purpose cleaners on leather. These strip the natural oils and cause irreversible surface damage even from a single use.
Natural DIY alternatives
If you prefer to keep your leather conditioning routine free of commercial chemicals, a few household ingredients work reliably. Beeswax mixed with a small amount of jojoba or coconut oil makes an effective conditioner for boots and bag straps. Distilled white vinegar diluted 1:1 with water functions as a mild cleaner for light surface grime before you apply your conditioner, and it removes mold spores without harsh chemical exposure. Both options cost far less than branded products and avoid unnecessary solvents in your living space.
Step 1. Inspect and do a spot test
Before you apply any product, take two to three minutes to examine the leather carefully under good lighting. This step saves you from accidentally locking in damage or triggering a bad reaction with your cleaner or conditioner. Run your hand across the surface and pay attention to both obvious high-use areas and the spots you rarely notice, like the back of a sofa cushion, the inside of a bag strap, or the collar of a jacket. What you find during this inspection determines which products you reach for and how much work the cleaning phase will need.
What to look for during inspection
Your inspection should cover four specific issues that affect how you proceed with leather conditioning and cleaning. Dry patches tell you where the leather has lost the most moisture and will need extra conditioner applied. Surface cracks or peeling indicate advanced dryness or, in the case of bonded leather, delamination that conditioning won't reverse. Mold or mildew shows up as a gray or white powdery residue, usually in low-airflow spots, and requires full cleaning before you condition anything. Stains or discoloration need targeted treatment first, since conditioning over an untreated stain can permanently bond it deeper into the surface.
Work through this checklist before you open any product:
- Dry or faded patches, especially along seams and flex points
- Surface cracks, deep creases, or peeling
- Mold, mildew, or musty smell
- Stains, ink marks, or uneven discoloration
- Loose stitching or separation at seams
- Waxy or tacky buildup from previous product applications
How to run a spot test
A spot test confirms that your chosen cleaner or conditioner won't discolor or damage the leather before you treat the full surface. Pick a hidden area, such as the underside of a cushion flap, the inside of a bag handle, or the back heel of a boot. Apply a small amount of your product with a clean, soft cloth, work it in gently, and wait 10 to 15 minutes before checking the result.
If you see any darkening, stickiness, color transfer, or texture change after the spot test, stop immediately and choose a different product before moving forward.
Check three things when you return: whether the color has shifted, whether the surface texture feels altered, and whether the product absorbed evenly without leaving a visible residue. If all three look normal, you're clear to move on to cleaning and conditioning the rest of the item with confidence.
Step 2. Clean and dry the leather
Once your spot test confirms the product is safe, cleaning comes next. Skipping this step or rushing through it is the single most common mistake people make before leather conditioning, and it leads directly to accelerated wear. Dirt, sweat, and body oils sit on and inside the leather surface, and if you condition over them, you trap those particles against the fibers and seal them in. A proper cleaning before you condition takes less than 10 minutes and makes every other step more effective.
How to clean the surface
Apply your pH-balanced leather cleaner to a clean microfiber cloth, not directly onto the leather. Work in small sections using gentle circular motions, and keep your pressure light. The goal is to lift surface grime without abrading the finish or forcing debris deeper into the grain. For heavier soiling on boots or work gear, a soft-bristle brush can help loosen built-up residue in stitching channels and seams before you wipe with the cloth.

Follow this sequence for a full clean:
- Dampen a microfiber cloth with your leather cleaner
- Work from the top of the item downward to avoid dragging dirt onto clean areas
- Use small circular motions across each section
- Flip to a clean section of the cloth frequently to avoid redistributing grime
- Use a soft-bristle brush only on textured or stitched areas where the cloth can't reach
- Wipe down the entire surface with a second dry cloth to remove any cleaner residue
Never saturate the leather during cleaning. Excess moisture can swell the fibers, cause water staining, and loosen adhesives in structured items like bags and shoes.
How to dry leather safely
After cleaning, drying leather correctly matters as much as the cleaning method itself. Set the item in a well-ventilated area at room temperature and let it air dry completely before you move on to conditioning. This usually takes 20 to 30 minutes for small items and up to an hour for full furniture pieces or jackets.
Keep the leather away from direct sunlight, hair dryers, and heat vents during drying. Artificial heat pulls moisture out too fast and causes surface cracking or warping before you even apply conditioner. If you need to speed up the process, a fan positioned a few feet away works without the thermal risk. Touch the surface before proceeding: it should feel completely dry and slightly cool to the touch, not warm or damp.
Step 3. Condition, buff, and let it cure
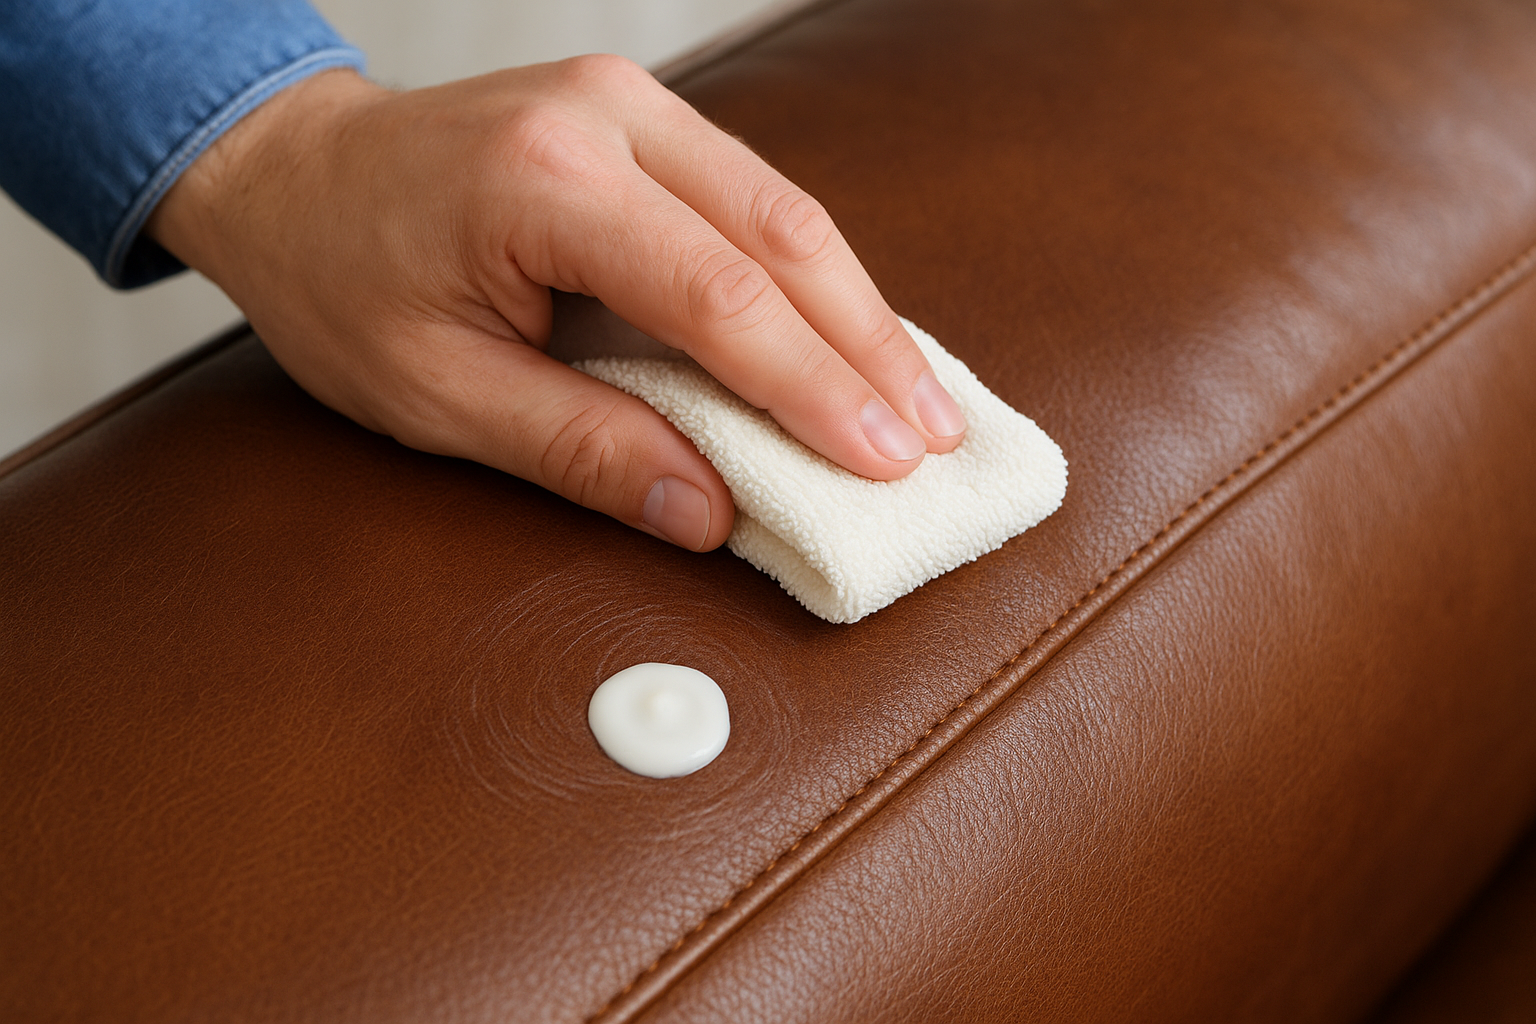
With clean, dry leather in front of you, this is where leather conditioning does its real work. Apply your chosen conditioner to a clean microfiber cloth or applicator pad, never directly onto the leather surface. Working with the cloth gives you better control over the amount you deposit, which prevents oversaturation and keeps the finish looking even across the entire piece.
Apply the conditioner evenly
Use small, circular motions to work the conditioner into the leather, covering one section at a time rather than spreading it across the whole surface at once. Thin, even coats absorb better than thick applications, and they reduce the risk of leaving a greasy film that attracts dust and lint. Pay extra attention to dry patches you identified during your inspection, but don't pile on extra conditioner in one pass. Apply a second light coat to those areas after the first one absorbs.
Follow this sequence for consistent application:
- Apply a dime-sized amount of conditioner to your cloth
- Work in small sections (roughly 12 by 12 inches) using circular motions
- Reload the cloth sparingly as you move to each new section
- Apply a second light layer to visibly dry or cracked areas only
- Let the conditioner sit for 5 to 10 minutes before moving to buffing
Don't rush the absorption period. Conditioner that sits long enough to penetrate the fibers provides far more lasting protection than product wiped off immediately after application.
Buff the surface and allow it to cure
After the conditioner has had time to absorb, take a fresh, dry microfiber cloth and buff the leather using long, straight strokes in the direction of the grain. Buffing removes any surface residue or excess product that didn't absorb fully, and it brings up a soft, natural sheen without leaving the leather looking artificially coated. Don't press hard during this step; light, consistent pressure is enough to pick up the residue and restore the surface.
Curing is the step most people skip entirely, and it's where the conditioning actually sets. Leave the item untouched at room temperature for at least two to four hours after buffing, and keep it away from heat sources and direct sunlight during that window. Full-grain leather furniture or large items like jackets benefit from an overnight cure before you put them back into regular use. Patience here means your conditioner bonds properly with the fibers instead of sitting loose on the surface where it wears off in days.
Step 4. Maintain and prevent future damage
Conditioning once and walking away won't keep leather in good shape long-term. How you store, use, and care for leather between conditioning sessions determines whether you're doing maintenance or constantly playing catch-up with damage. Building a simple routine around conditioning frequency and daily habits takes minimal time and extends the lifespan of your leather goods significantly.
How often to condition different leather types
Conditioning frequency depends on how much use the leather sees and what environment it lives in. A leather couch in an air-conditioned room needs less attention than a pair of work boots worn in the sun every day. As a general rule, condition leather goods every three to six months for regular use, and increase that to every four to six weeks for items exposed to heat, sweat, or outdoor conditions.
If your leather feels dry or stiff to the touch before your scheduled conditioning date, treat it immediately rather than waiting for the calendar.
Use this table as a starting reference for your leather conditioning schedule:
| Item | Recommended Frequency |
|---|---|
| Leather furniture (indoor) | Every 6 months |
| Leather bags and wallets | Every 3 to 4 months |
| Dress shoes (occasional wear) | Every 3 months |
| Work boots (daily wear) | Every 4 to 6 weeks |
| Automotive leather seats | Every 3 months |
| Leather jackets | Every 6 months |
| Suede and nubuck items | Every 3 to 4 months |
Storage and daily habits that extend leather life
Where and how you store leather matters almost as much as how often you condition it. Keep leather away from direct sunlight, which fades dye and dries out fibers faster than almost anything else in a typical home or vehicle. Store bags and jackets in breathable cotton dust bags rather than plastic covers, since plastic traps moisture and promotes mold growth against the surface.
For shoes and boots specifically, use cedar shoe trees between wears to maintain the shape and absorb moisture after use. Moisture trapped inside a shoe during storage breaks down the lining and dries the outer leather from the inside out, which conditioning on the surface alone won't fix.
Wipe down leather items with a dry microfiber cloth after each use to remove surface dust and oils before they work their way into the grain. This two-minute habit reduces how hard your next cleaning session needs to be and keeps buildup from compounding between conditioning cycles. Small, consistent actions protect your leather far better than intensive restoration efforts every year or two.
Quick recap and next steps
Good leather conditioning comes down to four repeatable steps: inspect and spot test, clean and dry, condition and buff, then maintain on a regular schedule. Each step builds on the last, which is why skipping any one of them produces worse results than the effort you put in deserves. You now know which leather types need conditioning, how often to do it, which products work for each surface, and what daily habits keep damage from building between sessions.
The cleaners you use before conditioning matter as much as the conditioner itself. Harsh solvents and chemical-heavy sprays strip leather fibers and accelerate the very damage you're trying to prevent. If you're already thinking carefully about what you put on your leather, apply that same standard to the rest of your cleaning routine. Our eco-friendly leather cleaner & conditioner gives you a non-toxic, biodegradable option that won't harm surfaces or the people around them.