

Dirty condenser coils are one of the most common, and most overlooked, reasons an AC unit or refrigerator starts underperforming. When dust, grime, and debris build up on coil surfaces, the system can't release heat efficiently. That means longer run times, higher energy bills, and accelerated wear on components you'd rather not replace. Learning how to clean condenser coils properly is one of the simplest maintenance tasks you can do to keep cooling equipment running the way it should.
The catch? Many conventional coil cleaners rely on harsh acids or corrosive chemicals that can damage fin surfaces, create toxic fumes, and introduce safety hazards for anyone doing the work. That's exactly why we developed Eco Safeway's line of non-toxic, HMIS 0-0-0 rated condenser coil cleaners, formulations that cut through buildup without corroding equipment or putting your health at risk.
This guide walks you through the full process step by step: what tools you'll need, how to clean coils safely and effectively, and how to choose a cleaning solution that protects both your equipment and the people around it. Whether you're maintaining a residential AC unit or managing coils across a commercial facility, the fundamentals are the same, and getting them right pays off fast.
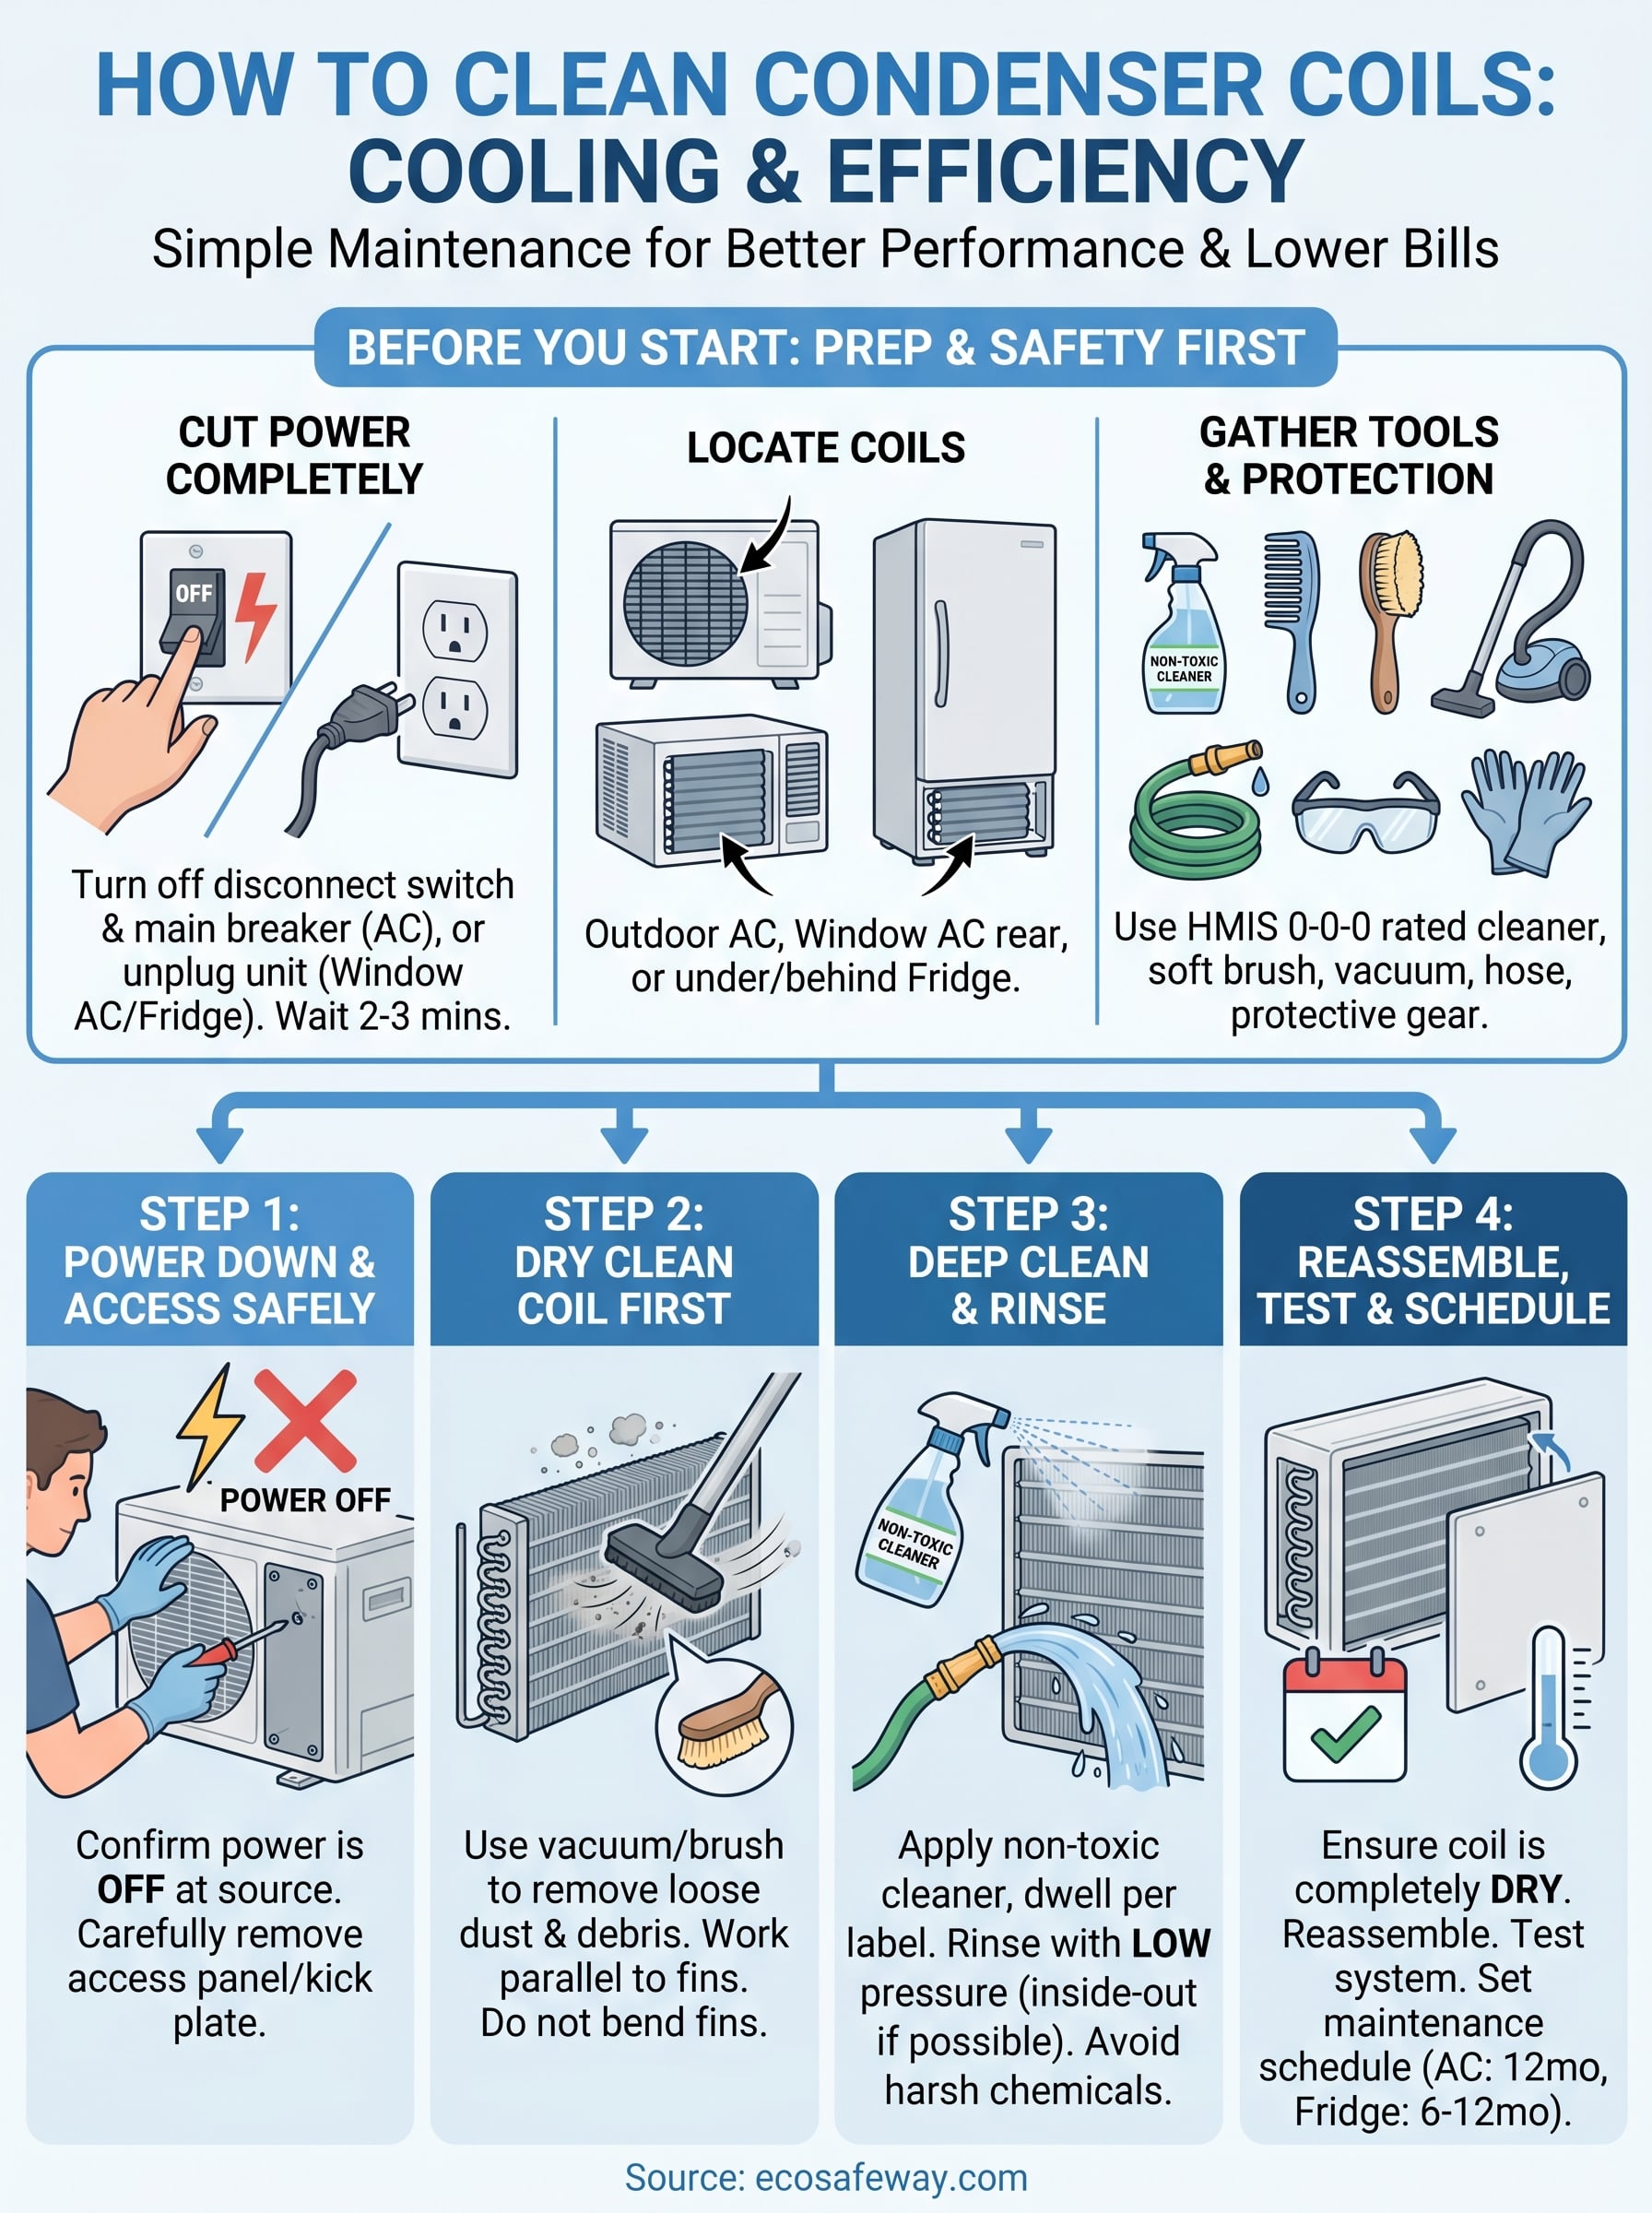
Before you start: find coils, gather tools, stay safe
Before you touch anything, you need to know where your condenser coils are located and what you're working with. Condenser coils sit in the outdoor unit of a central AC system, behind the access panel of a window unit, or underneath and at the back of a refrigerator. Each location calls for slightly different access and tool choices, but the prep work is equally important regardless of equipment type.
Where to find your condenser coils
For central air conditioning units, the condenser coil wraps around the exterior of the outdoor cabinet. You'll see aluminum fins visible through the metal grille on the sides of the unit. For window units, remove the outer casing to expose the coil sitting just behind the rear grille. Refrigerator condenser coils are typically located either underneath the unit behind a kick plate or mounted at the back, depending on the model. Check your appliance manual if your unit isn't matching either description.

Tools and supplies you need
Having everything ready before you start prevents shortcuts and keeps the job moving. Here's what you need for a complete coil cleaning:
- Non-toxic coil cleaner (HMIS 0-0-0 rated is strongly recommended to protect fins and avoid fumes)
- Fin comb for straightening bent aluminum fins
- Soft-bristle brush or dedicated coil cleaning brush
- Vacuum with a brush attachment for removing dry debris first
- Garden hose or low-pressure sprayer for rinsing
- Protective gloves and safety glasses
- Flashlight for inspecting tight or shaded spaces
- Screwdriver set for removing access panels
Avoid foaming coil cleaners that contain acids or high-pH solvents. These corrode fin surfaces over repeated use and require protective equipment that adds time and cost to the job.
Safety basics before you touch anything
Shutting off power is non-negotiable before you access any coil. For outdoor AC units, flip the disconnect switch on the exterior box near the unit, then shut it off at the breaker panel as well. For refrigerators, unplug the unit from the wall. Never assume the system is off simply because the thermostat is set low or the compressor sounds quiet.
Always verify power is off at the source before removing any panel. This is the most preventable mistake people make when learning how to clean condenser coils.
Working around coil fins also means handling sharp metal edges throughout the process, so keep your gloves on from start to finish.
Step 1. Shut off power and access the coil safely
Skipping the power shutoff is how people get hurt, and it's completely avoidable. Before you get into how to clean condenser coils, you need to eliminate the electrical hazard entirely. Coils sit close to live components, and even brief contact can cause serious injury. Cutting power at both the disconnect and the breaker is the correct approach for any central AC unit, with no exceptions.
How to cut power to each equipment type
The shutdown process differs by equipment, but cutting power completely is required before you touch anything. Wait two to three minutes after disconnecting power before removing any panels or touching internal components.
- Central AC unit: Flip the disconnect switch in the box mounted near the outdoor cabinet, then shut off the corresponding circuit at your main breaker panel.
- Window unit: Unplug the power cord directly from the wall outlet.
- Refrigerator: Pull the appliance away from the wall and unplug the cord from the outlet before doing anything else.
Never rely on just turning off the thermostat. The circuit stays live until you cut power at the source.
How to remove the access panel
Once power is confirmed off, use a screwdriver to remove the fasteners holding the access panel in place. On central AC units, the top grille or side panel lifts off once the screws are out. On refrigerators, the kick plate at the bottom typically pulls away with light hand pressure. Set the panel somewhere it won't get bent or stepped on while you work.
Step 2. Dry clean the coil and clear airflow blockages
Dry cleaning comes before any liquid application. Applying a wet cleaner to a coil loaded with loose debris turns that debris into mud, pushes it deeper into the fins, and makes rinsing significantly harder. Removing dry buildup first gives your cleaner direct contact with the coil surface where the real fouling lives, making the entire process more effective.
Use a vacuum and brush to remove surface debris
Start with your vacuum and brush attachment to pull loose dust, pet hair, and debris off the coil fins. Work from top to bottom using light, straight strokes that run parallel to the fins, never across them. Moving sideways bends the fins, which restricts airflow and partially cancels out the cleaning work you're doing. For stubborn patches of compacted debris, use a soft-bristle coil brush with the same parallel motion.
Bent fins reduce airflow just as much as a dirty coil. Use a fin comb to straighten any damaged sections before you apply cleaner or water.
Clear the area around the unit
Airflow blockages outside the cabinet matter just as much as the coil surface itself. On outdoor AC units, pull away grass clippings, leaves, and any vegetation that has grown up against the exterior panels. For refrigerators, pull the unit away from the wall and clear the floor around the coil area so air can circulate freely once cleaning is complete. A clean coil in a blocked enclosure still runs inefficiently, which is a straightforward mistake to avoid when you understand how to clean condenser coils the right way.
Step 3. Deep clean and rinse without damaging fins
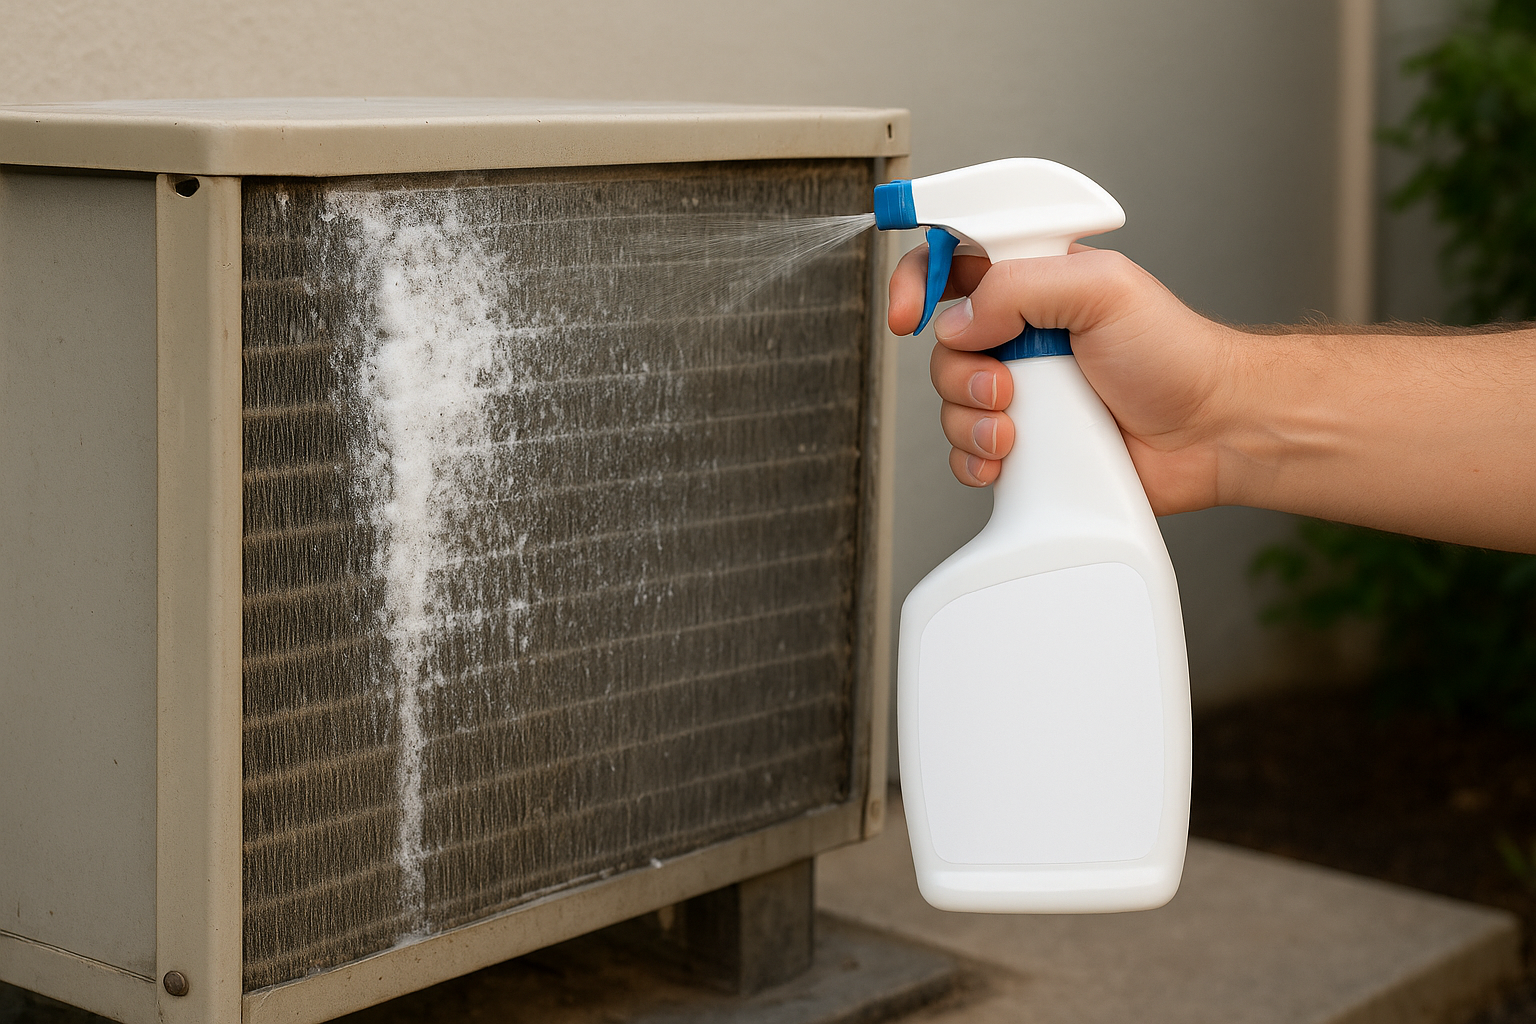
With the dry debris cleared, you're ready to apply your coil cleaner and break down the bonded grime that vacuuming can't remove. This is the step where product choice matters most in how to clean condenser coils, because the wrong formula can corrode fin surfaces, strip protective coatings, and create fumes in enclosed spaces.
Apply the coil cleaner correctly
Spray your non-toxic coil cleaner directly onto the fin surfaces, working in sections from top to bottom. Let the product dwell for the time listed on the label, typically two to five minutes for most non-foaming formulas. That contact time lets the cleaner penetrate and loosen stuck-on grime without you scrubbing aggressively and bending fins.
Follow these application guidelines for consistent results:
- Keep the nozzle 6 to 8 inches from the fin surface to avoid bending fins with spray pressure
- Work in small sections rather than coating the entire coil at once
- For heavily soiled coils, apply a second light pass after rinsing the first rather than doubling dwell time on one coat
Never use a wire brush or stiff-bristle scrubber on fin surfaces. Aluminum fins bend easily, and physical damage from scrubbing restricts airflow just as badly as the grime you're removing.
Rinse without forcing debris deeper
Rinse the coil using a garden hose on a low-pressure setting, directing water from the inside out wherever your unit allows this approach. Rinsing outward pushes loosened debris away from the coil rather than compacting it back against the fins. On refrigerator coils, use a damp cloth or light misting spray instead of a direct hose stream, since these units are not designed for wet rinsing. Allow the coil to air dry completely before moving to reassembly.
Step 4. Reassemble, test performance, and set a schedule
Once the coil is completely dry, you're ready to close everything back up. Reinstalling a panel over a wet coil traps moisture against the fins and can promote mold growth inside the cabinet, which defeats the entire point of a thorough cleaning.
How to reassemble and restore power
Replace the access panel and fasten all screws back in their original positions before restoring power. For outdoor AC units, flip the breaker back on first, then reset the exterior disconnect switch. For refrigerators, plug the unit back into the wall and push it back into position, leaving at least two inches of clearance behind the unit for airflow. Run the system for 10 to 15 minutes and check for any unusual noises or error codes before confirming the job is done.
If the unit is running noticeably quieter or cycling off faster than before cleaning, that is a direct sign the coil is shedding heat more efficiently.
Set a cleaning schedule that protects efficiency
Knowing how to clean condenser coils is only half the job. Sticking to a regular schedule is what keeps performance gains from disappearing. The right interval depends on your environment and equipment type:
| Equipment | Recommended Cleaning Frequency |
|---|---|
| Outdoor central AC unit | Every 12 months, before cooling season |
| Window AC unit | Every 6 months with seasonal use |
| Refrigerator coils | Every 6 to 12 months |
| Commercial or high-dust environments | Every 3 to 6 months |
Mark your calendar now so the next cleaning does not get pushed aside until problems surface.
Quick recap and next steps
Knowing how to clean condenser coils correctly means working through the steps in order: cut power completely, dry clean before applying any liquid, use a cleaner that won't corrode your fins, rinse properly, and reassemble only when everything is dry. Each step builds on the one before it, and skipping any of them typically creates more work down the road, not less.
Your cleaning results also depend heavily on what product you apply. Acid-based and high-pH coil cleaners get the job done in the short term but degrade fin surfaces over repeated use, add safety risks, and often require hazmat handling. Choosing a non-toxic, HMIS 0-0-0 rated formula protects your equipment, your health, and the people working around you. If you want a coil cleaner built specifically for that standard, visit Eco Safeway's non-toxic condenser coil cleaners to see what we offer for commercial and residential applications.